


How to Remove Water Spots from Car Paint Without Damaging the Finish
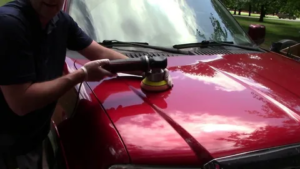
Water spots may seem harmless at first, but they can quickly dull your car’s beautiful shine. These spots often form when minerals, salts, or dirt remain after water evaporates. Over time, they etch into the clear coat and damage the finish. In this guide, you’ll learn how to safely remove water spots from car paint using proven, paint-safe techniques that protect your vehicle’s appearance. What Causes Water Spots on Car Paint? Water spots appear when hard water, containing minerals like calcium and magnesium, dries on your car’s surface. These minerals bond with the paint and create stubborn marks. Other causes include acid rain, sprinklers, and even washing under direct sunlight. Understanding their origin helps you choose the right removal method before damage becomes permanent. Types of Water Spots You May Encounter 1. Mineral Deposits: These are the most common and come from tap water or rainwater drying on your car’s paint.2. Etched Water Spots: These occur when minerals penetrate the clear coat and start eating into the paint layer.3. Bonded Contaminants: These are advanced spots mixed with dirt or environmental fallout that require deeper cleaning or clay treatment. Each type requires a slightly different approach to restore your car’s original


