How to Ceramic Coat a Car: A Complete Beginner to Pro Guide

Modern car owners want more than just a clean vehicle. They want long-lasting protection, deeper shine, and easier maintenance. That is why many people are searching for how to ceramic coat a car and whether it is worth the effort. Ceramic coating has changed the way vehicles are protected, offering a durable barrier that goes far beyond traditional waxes and sealants.

In this guide, you will learn exactly how ceramic coating works, how to apply it correctly, and when it makes sense to choose a professional ceramic coating service instead of doing it yourself.

1.  What Does It Mean to Ceramic Coat a Car?

When you ceramic coat a car, you apply a liquid polymer that chemically bonds with the vehicle’s clear coat. Unlike wax, which sits on the surface, ceramic coating becomes part of the paint protection system.

Once cured, the coating creates a hydrophobic layer that repels water, dirt, road grime, and contaminants. This layer also protects the paint from UV rays, oxidation, chemical stains, and light scratches. The result is a glossy, mirror-like finish that stays cleaner for longer periods.

2.  Benefits of Ceramic Coating

Before learning how to ceramic coat a car, it is important to understand why so many car owners choose it.

Key benefits include:

  • Long-term paint protection
  • Enhanced gloss and depth
  • Easier washing and maintenance
  • Resistance to UV damage and fading
  • Reduced buildup of dirt and contaminants

A high-quality ceramic coating service can keep your car looking newer for years rather than months.

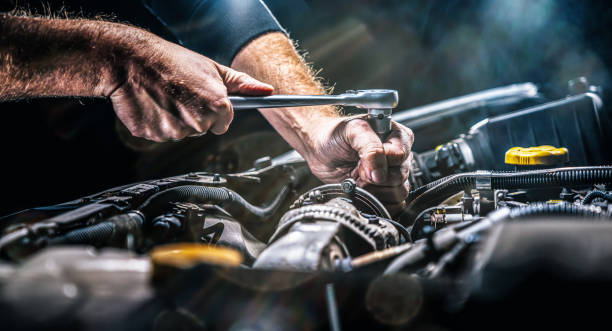
3.  What You Need Before You Start

Preparation is the foundation of a successful ceramic coating. Skipping steps can lead to poor bonding and reduced durability.

You will need:

  • pH-neutral car shampoo
  • Two bucket wash system
  • Clay bar or clay mitt
  • Iron and fallout remover
  • Dual action polisher
  • Polishing compound and finishing polish
  • Isopropyl alcohol solution
  • Ceramic coating product
  • Applicator pads
  • Multiple clean microfiber towels

Step 1: Deep Cleaning the Vehicle

Start by washing the car thoroughly using a pH-neutral shampoo. This removes surface dirt, grease, and traffic film. Use microfiber wash mitts and avoid aggressive scrubbing.

Rinse thoroughly and dry the vehicle completely. Any moisture left behind can interfere with the coating process.

Step 2: Paint Decontamination

Even after washing, paint surfaces hold embedded contaminants that are invisible to the eye. Use an iron remover to dissolve brake dust and metal particles, then follow with a clay bar to remove bonded contaminants.

This step ensures a smooth surface and allows the coating to bond properly when you ceramic coat a car.

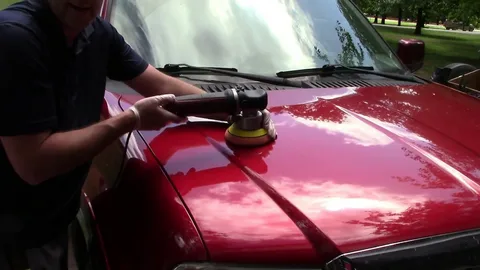
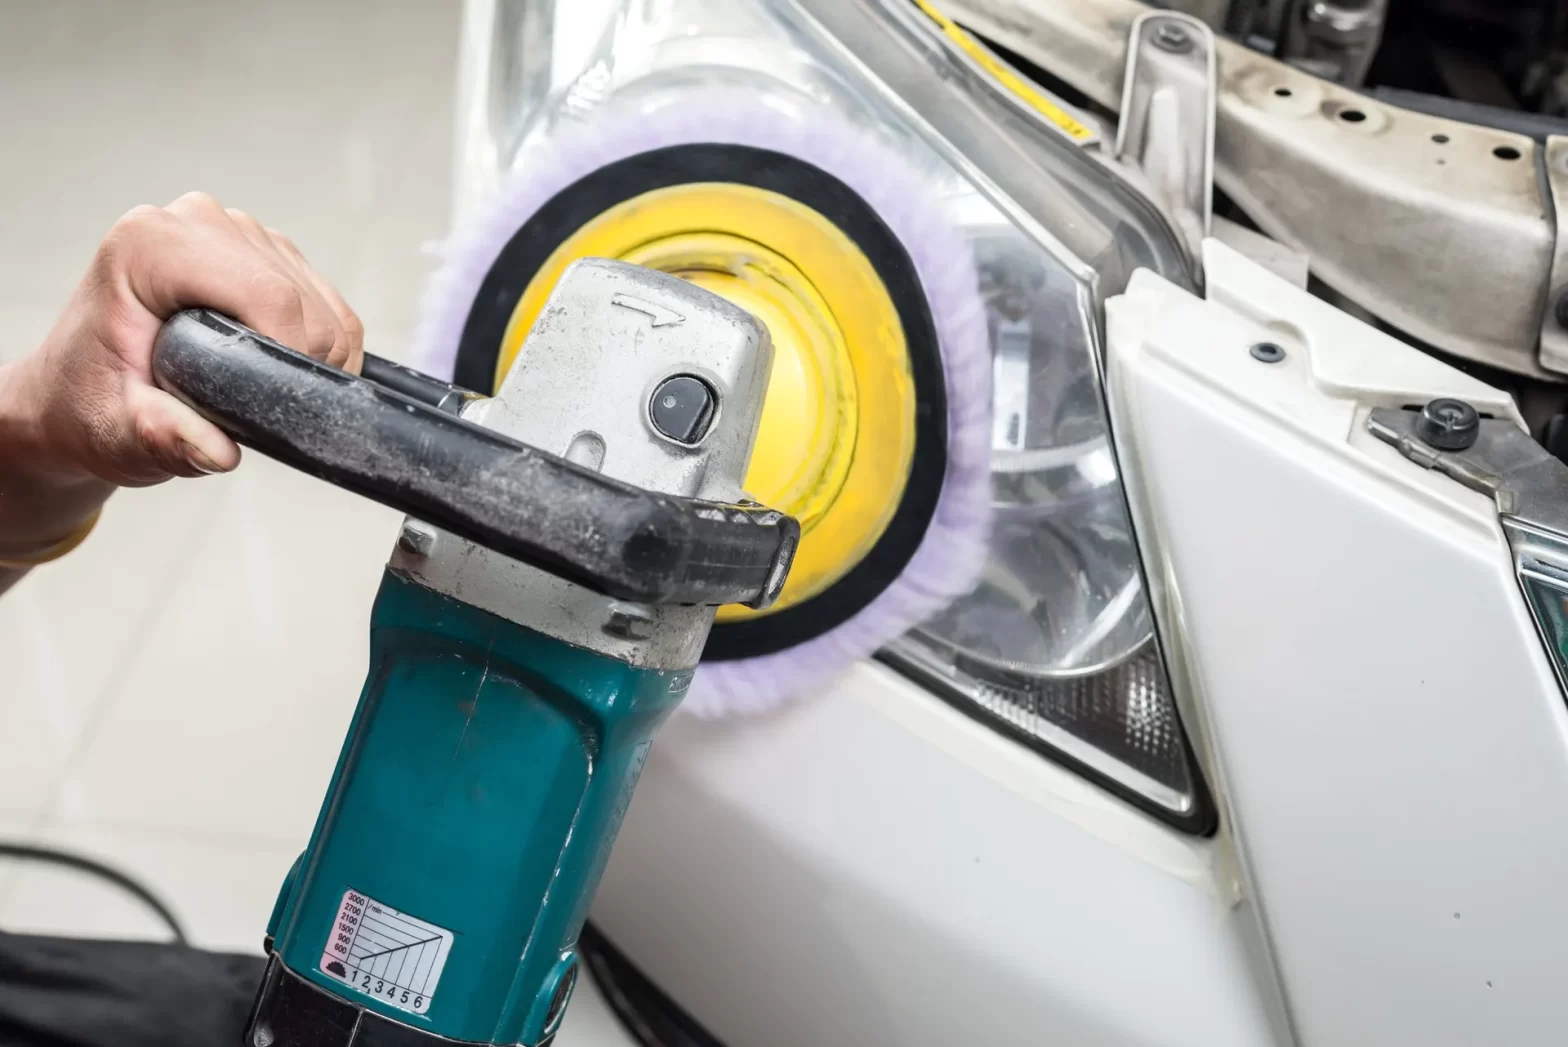
Step 3: Paint Correction and Polishing

Paint correction is one of the most critical steps. Swirl marks, light scratches, and oxidation must be removed before applying ceramic coating.

Use a dual-action polisher to restore clarity and gloss. If polishing is done incorrectly, it can cause permanent damage, which is why many vehicle owners rely on a professional ceramic coating service for this stage.

Step 4: Surface Preparation

After polishing, wipe down the entire vehicle using an isopropyl alcohol solution. This removes oils and residues left by polishing compounds.

This step ensures a completely clean surface, which is essential if you want to ceramic coat a car successfully and achieve maximum durability.

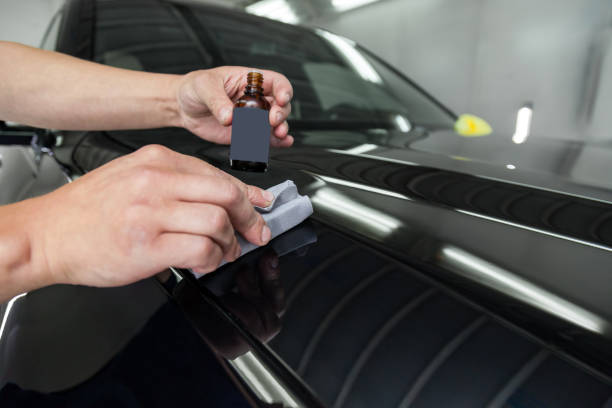
Step 5: Applying the Ceramic Coating

This is the most delicate part of the process. Apply a few drops of ceramic coating to the applicator pad and spread it evenly across small sections using a cross-hatch pattern.

Allow the coating to flash based on the manufacturer’s instructions. Once it begins to haze, gently buff off excess product using a clean microfiber towel. Work panel by panel.

Precision and patience are key. Rushing this step can result in streaks or high spots.

Step 6: Curing Time and Aftercare

After application, the ceramic coating must cure. Keep the car indoors and avoid water exposure for at least 24 hours. Full curing usually takes 5 to 7 days.

During this time:

  • Do not wash the car
  • Avoid rain and moisture
  • Avoid direct sunlight

Proper curing ensures that when you ceramic coat a car, the protection lasts as long as intended.

4.  DIY Ceramic Coating vs Professional Ceramic Coating Service

DIY ceramic coating kits are widely available, but they come with risks. Incorrect application, poor surface preparation, or improper curing can shorten the lifespan of the coating.

A professional coating service offers:

  • Controlled indoor environments
  • Advanced polishing equipment
  • Experienced technicians
  • Multi-layer coating options
  • Warranty-backed protection

For high-value or new vehicles, choosing a professional coating service often delivers better and longer-lasting results.

5.  How Long Does Ceramic Coating Last?

The lifespan of ceramic coating depends on product quality, application method, and maintenance habits. A properly applied coating can last between two and five years.

Regular maintenance washing, avoiding harsh chemicals, and using proper drying methods will extend its life. When done correctly, choosing to coat a car is a long-term investment rather than a temporary solution.

6Common Mistakes to Avoid

When learning how to ceramic coat a car, avoid these common errors:

  • Skipping paint correction
  • Applying coating in direct sunlight
  • Using dirty microfiber towels
  • Applying too much product
  • Washing the car too soon after application

Avoiding these mistakes significantly improves results and durability.

7.  Is Ceramic Coating Worth It?

For most vehicle owners, the answer is yes. Ceramic coating provides unmatched protection, improves aesthetics, and reduces maintenance time.

Whether you decide to ceramic coat a car yourself or choose a professional ceramic coating service, the benefits far outweigh the cost when done properly.

Final Thoughts

Understanding how to ceramic coat a car helps you appreciate why this process has become the gold standard for vehicle protection. From preparation to curing, each step plays a vital role in achieving a flawless finish.

If you want lasting gloss, easier cleaning, and superior paint protection, ceramic coating is one of the best options available. When you coat a car, you are not just enhancing its appearance; you are preserving its value and protecting it for years to come. Wantz Details professional ceramic coating services provide long-lasting paint protection against UV rays, oxidation, and environmental damage while delivering a deep, mirror-like gloss and easier maintenance for years to come.

Call us today: (610) 233-6845

Email: info@wantzdetails.com

Frequently Asked Questions (FAQS)

1. How long does it take to ceramic coat a car?
Typically, 1 to 2 days, including preparation, application, and curing.

2. Can I ceramic coat a car myself?
Yes, but a professional application delivers better durability and finish.

3. How long does ceramic coating last?
Usually, 2 to 5 years with proper maintenance.

4. Does ceramic coating prevent scratches?
It reduces minor swirl marks but does not stop deep scratches.

5. Is ceramic coating better than wax?
Yes, it lasts longer and provides stronger paint protection

How Much Does Engine Detailing Cost

Maintaining a clean engine is more than just aesthetics. A well-detailed engine improves performance, prolongs vehicle life, and makes maintenance easier. If you are wondering how much does engine detailing cost, this guide will help you understand the factors affecting the price, what services to expect, and whether professional or DIY options are best for your needs. With the right knowledge, you can make an informed choice and ensure your engine stays in top condition.

What is Engine Detailing?

Engine detailing is the process of thoroughly cleaning your vehicle’s engine bay. Unlike a simple wash, engine detailing involves removing grease, dirt, and grime from hard-to-reach areas, protecting sensitive components, and applying protective coatings to prevent corrosion.

Professional detailers use specialized tools, brushes, and eco-friendly cleaning solutions to ensure the engine is spotless without causing damage. They also take care to protect delicate parts like electrical components, sensors, and belts. Understanding how much does engine detailing cost depends on the type of service and level of care your engine requires.

Even if your engine looks clean from the outside, accumulated grease and grime can reduce efficiency and lead to costly repairs. Professional engine detailing services focus on deep cleaning, which helps maintain the engine’s health and extends its lifespan.

Factors Affecting Engine Detailing Costs

Several factors determine the price of engine detailing. Knowing these can help you anticipate costs and choose the right service.

1. Vehicle Type and Engine Size

Larger engines, such as those in trucks or SUVs, require more time and cleaning products to detail. Compact engines, like those in sedans or small hatchbacks, are faster to clean. Naturally, a bigger engine means higher labor costs, which affects how much does engine detailing cost.

2. Condition of the Engine

A heavily soiled engine with oil leaks or dirt buildup takes longer to clean and may require special degreasers and treatments. If your vehicle hasn’t had its engine cleaned in years, the cost will be higher than for a lightly dirty engine.

3. Detailing Method

Engine detailing can involve steam cleaning, hand scrubbing, or chemical degreasing. Steam cleaning is faster and more effective for removing grease, but it may cost more. Hand detailing requires more labor but offers a more precise clean for sensitive parts. Additional coatings for protection can also add to the cost.

4. Location and Service Provider

Prices vary by region and the type of service provider. Mobile services may charge slightly less but might not offer the same thorough results as a professional auto detailing center. Urban areas tend to have higher pricing due to demand and overhead costs.

Typically, engine detailing services range from $75 to $250, but premium vehicles or engines in poor condition may cost more. Understanding these factors helps you make a budget-conscious choice while still getting quality results.

DIY vs Professional Engine Detailing

Many car owners consider DIY cleaning to save money, but there are pros and cons to both approaches.

DIY Engine Detailing

If you enjoy working on your vehicle and have basic tools, a DIY clean is possible. Kits with degreasers, brushes, and microfiber cloths are widely available. However, improper handling can damage delicate electrical components, hoses, or sensors. Also, DIY cleaning may not reach every nook and cranny, leaving some grime behind.

Professional Engine Detailing

Professional services offer peace of mind. Trained technicians use safe methods and high-quality products to achieve a thorough clean. Using professional engine detailing services ensures your engine is cleaned efficiently and safely, reducing the risk of damage and prolonging its lifespan.

While professional services may cost more than DIY cleaning, the benefits often outweigh the expense, especially for high-end vehicles or engines with heavy buildup.

Benefits of Professional Engine Detailing

Investing in professional engine detailing services offers several advantages:

  • Improved Performance: A clean engine runs cooler and more efficiently, reducing the risk of overheating.
  • Extended Lifespan: Removing grease and dirt reduces wear on belts, hoses, and other components.
  • Easier Maintenance: Identifying leaks or worn parts becomes easier with a clean engine.
  • Aesthetic Appeal: A polished engine bay improves the overall look of your vehicle and can increase resale value.
  • Corrosion Protection: Protective coatings applied during detailing prevent rust and corrosion.

These benefits make professional engine detailing worth considering, especially if you want long-term performance and peace of mind.

Average Cost of Engine Detailing

Here’s a breakdown of what you can expect to pay for engine detailing services:

Type of ServicePrice Range
Basic Engine Cleaning$75 – $120
Full Engine Detail$150 – $250
Luxury or Performance Vehicles$200 – $400

Keep in mind that the exact price depends on the engine type, size, condition, and location. Some service providers offer packages that include interior and exterior detailing, which can make professional engine detailing services more affordable.

How to Choose the Right Engine Detailing Service

Choosing the right provider ensures quality results and protects your engine. Here’s what to look for:

  • Experience and Reputation: Look for detailers with positive reviews and experience with your vehicle type.
  • Products and Methods: Ask about cleaning solutions, brushes, and protective coatings used.
  • Insurance and Guarantees: Professional detailers should offer protection for accidental damage.
  • Pricing Transparency: Request a clear estimate with no hidden fees.

Hiring a skilled professional may cost more upfront, but it ensures your engine is cleaned safely, efficiently, and thoroughly.

Tips for Reducing Engine Detailing Costs

  • Regular Maintenance: Light cleaning between professional services prevents heavy buildup.
  • Package Deals: Combining engine detailing with full vehicle detailing can save money.
  • Mobile Services: Some mobile services offer lower rates while still providing quality care.
  • DIY Touch-Ups: Minor cleaning with approved products between professional services keeps the engine looking fresh.

Common Misconceptions About Engine Detailing

  • It’s Only for Looks: While appearance is a benefit, engine detailing also improves performance and maintenance.
  • It’s Risky: When done by professionals using safe methods, detailing is completely safe.
  • It’s Expensive: DIY options exist, and professional services are cost-effective when considering long-term benefits.

Understanding how much does engine detailing cost and the advantages of professional services can help you make an informed decision.

Final Verdict

Knowing how much does engine detailing cost depends on several factors, including engine size, condition, and whether you choose DIY or professional services. While DIY cleaning may save money upfront, professional engine detailing services provide a thorough, safe, and lasting clean that protects performance and extends engine life.

Investing in regular engine detailing not only keeps your vehicle looking great but also prevents damage and supports easier maintenance. By choosing a trusted auto detailer, you ensure that your engine stays clean, efficient, and protected for years to come.

Remember, a well-maintained engine is not just about looks; it’s about performance, reliability, and peace of mind on every drive. When in doubt, trust Wantz Details to provide the care your engine deserves. For more details. Call us today at (610) 233-6845 or email us at info@wantzdetails.com.

Frequently Asked Questions (FAQS)

1. How often should I get engine detailing?
 For most vehicles, professional engine detailing services are recommended every 12 to 18 months, or sooner if the engine is heavily soiled.

2. Can I detail my engine myself?
 Yes, DIY cleaning is possible, but professional engine detailing services are safer and more thorough, especially for sensitive components.

3. Does engine detailing improve performance?
 Yes, a clean engine runs cooler, reduces wear, and makes maintenance easier, enhancing overall vehicle performance.

4. How much does engine detailing cost for a standard car?
 Typical prices range from $75 to $250 depending on engine size, condition, and the service provider. Luxury vehicles may cost more.

5. Is engine detailing safe for my car?
 When done by a professional auto detailer, engine detailing is completely safe. They use proper tools and products to protect sensitive parts.

How to Remove Water Spots from Car Paint Without Damaging the Finish

Water spots may seem harmless at first, but they can quickly dull your car’s beautiful shine. These spots often form when minerals, salts, or dirt remain after water evaporates. Over time, they etch into the clear coat and damage the finish. In this guide, you’ll learn how to safely remove water spots from car paint using proven, paint-safe techniques that protect your vehicle’s appearance.

What Causes Water Spots on Car Paint?

Water spots appear when hard water, containing minerals like calcium and magnesium, dries on your car’s surface. These minerals bond with the paint and create stubborn marks. Other causes include acid rain, sprinklers, and even washing under direct sunlight. Understanding their origin helps you choose the right removal method before damage becomes permanent.

Types of Water Spots You May Encounter

1. Mineral Deposits: These are the most common and come from tap water or rainwater drying on your car’s paint.
2. Etched Water Spots: These occur when minerals penetrate the clear coat and start eating into the paint layer.
3. Bonded Contaminants: These are advanced spots mixed with dirt or environmental fallout that require deeper cleaning or clay treatment.

Each type requires a slightly different approach to restore your car’s original gloss safely.

Step-by-Step Guide to Remove Water Spots Safely

Step 1: Wash the Car Thoroughly

Start by washing your car with a pH-balanced car shampoo and microfiber mitt. This step removes loose dirt, grime, and contaminants that may scratch the surface during cleaning. Always work in a shaded area to prevent water from drying too quickly.

Step 2: Use a Vinegar Solution for Light Spots

Mix equal parts distilled white vinegar and water in a spray bottle. Spray it directly on affected areas and let it sit for one minute. Then, gently wipe using a clean microfiber towel. Vinegar breaks down mineral deposits without harming the paint’s protective layer.

Step 3: Apply a Clay Bar Treatment

If the spots remain, use a clay bar with a lubricant. The clay lifts bonded contaminants from the surface, restoring smoothness and clarity. Work in small sections and regularly fold the clay to expose a clean surface. This step safely removes deep water spots without abrasives.

Step 4: Use a Water Spot Remover or Mild Polish

For stubborn etching, apply a specialized water spot remover or light polish. Use a soft foam applicator and gentle circular motions. Avoid aggressive rubbing, as this can thin the clear coat. Once the surface feels smooth, buff it with a microfiber towel to restore shine.

Step 5: Protect with Wax or Sealant

After cleaning, apply a high-quality wax or ceramic sealant. This creates a protective barrier that repels water, dust, and contaminants. A well-protected paint surface resists future water spots and maintains a deep, glossy finish longer.

Common Mistakes to Avoid When Removing Water Spots

  • Never use harsh chemicals like household cleaners or acids, as they strip the clear coat.
  • Avoid using dry towels or paper products, which can create swirl marks.
  • Don’t wash in direct sunlight, as it accelerates drying and causes new spots.
  • Skipping protection after cleaning allows minerals to bond again quickly.

Following safe practices ensures your paint stays bright and free of micro-scratches.

Preventing Water Spots in the Future

Prevention is easier than correction. Always dry your car immediately after washing using a microfiber drying towel or blower. Use filtered water or a water deionizer for rinsing to reduce mineral deposits. Apply paint protection coatings regularly and avoid parking near sprinklers or under trees where mineral-filled water may splash.

Summary

Removing water spots from your car paint requires patience, gentle cleaning products, and proper technique. By washing thoroughly, using vinegar solutions, clay bars, or spot removers, and finishing with a protective wax layer, you can safely restore your vehicle’s flawless finish. Prevention and regular maintenance are the best ways to keep your car spot-free and gleaming.

Top Waxing Products for Mobile Technicians: Long-Lasting Shine & Ease of Application

Mobile detailing requires speed, efficiency, and reliable results. Unlike a shop environment, a mobile technician works outdoors, often with limited water, power, and time. When it comes to waxing, the ideal product should provide a long-lasting shine while being fast and easy to apply in different weather conditions.
Below is a guide to the best types of waxes for mobile use and the products that consistently deliver professional results.

What Mobile Technicians Need in a Wax?

Before looking at specific products, it helps to understand the key features that matter most in the field.

Long-Lasting Protection

A good wax should withstand rain, UV rays, and car washes for several months. Longer durability means happier clients and fewer reapplications.

Quick and Simple Application

Mobile jobs demand efficiency. Waxes that spread easily, cure quickly, and wipe off cleanly save valuable time.

Versatility

Since mobile technicians work on various paint colors and conditions, the wax should perform well on different finishes, including clear coats and darker paints.

Weather Tolerance

Products that can be applied in mild sun or cooler conditions help avoid delays when working outdoors.

Best Types of Wax for Mobile Detailing

Spray Wax

Spray wax is perfect for maintenance jobs and quick shine. It applies in minutes and works well as a topper for existing protection.
Best Use: Maintenance details or add-on services after a wash.

Liquid Wax

Liquid wax balances durability and ease of use. It spreads smoothly with a foam applicator or dual action polisher and wipes off without heavy buffing.
Best Use: Standard mobile detailing jobs where lasting protection is required.

Paste Wax

Traditional paste wax often provides the deepest gloss and longest protection but takes more time to apply.
Best Use: Premium packages where customers want a showroom look.

Top Waxing Products for Mobile Professionals

These products are widely respected among detailers for their durability and user-friendly application.

Meguiar’s Hybrid Ceramic Wax

This spray-on formula combines carnauba warmth with ceramic protection. It can be applied to wet or dry paint and requires minimal buffing, making it ideal for fast mobile jobs.

Turtle Wax Seal N Shine

Known for excellent water beading and long life, this hybrid product offers up to six months of protection. It sprays on and wipes off easily, saving time in the field.

Collinite 845 Insulator Wax

A liquid wax famous for extreme durability. It works well in different climates and provides a bright, glassy shine that lasts for months.

P&S Bead Maker

Although technically a paint sealant, Bead Maker is popular with mobile detailers for its slick finish and incredible water repellency. It sprays on and wipes off quickly, perfect for maintenance details.

Chemical Guys Butter Wet Wax

This carnauba-based liquid wax is easy to spread and remove, even in warm weather. It produces a deep, wet look on dark paint, ideal for clients who love a rich glow.

Application Tips for Mobile Technicians

  • Work in Small Sections: This prevents streaking and ensures even coverage.
  • Use Quality Microfiber Towels: Soft towels reduce the risk of swirl marks.
  • Layer for Extra Protection: Some hybrid waxes can be layered after curing for added durability.
  • Avoid Direct Sunlight When Possible: Even sun-tolerant waxes perform best on cool panels.

Key Takeaway

For mobile detailing, the best waxing products combine long-lasting protection with quick application. Spray waxes like Meguiar’s Hybrid Ceramic Wax or Turtle Wax Seal N Shine save time while offering solid durability. For clients who want extended protection, liquid waxes such as Collimate 845 provide months of shine. By choosing the right wax for each job and applying it efficiently, mobile technicians can deliver professional results that impress customers and keep schedules on track.

Maintenance Tips After Getting a Ceramic Coating: Washing, Polishing, and Repairs

A ceramic coating protects your car’s paint with a durable, hydrophobic layer that repels water, dirt, and light scratches. While it reduces the need for constant waxing, it is not maintenance free. Proper washing, occasional polishing, and timely repairs will keep the coating performing at its best for years.
Here’s how to care for a ceramic coated car the right way.

Understanding What a Ceramic Coating Does

A ceramic coating bonds to the paint and creates a thin, transparent layer that resists UV rays, chemicals, and light marring. It makes water bead off the surface and makes cleaning easier.
However, it is not a permanent shield. Contaminants like bird droppings, road salt, and tree sap can still damage the coating if left for too long, and heavy scratches can penetrate the layer.

Washing Tips to Preserve the Coating

Regular washing is the most important step in maintaining a ceramic coating.

  • Use a pH Neutral Car Shampoo: Strong detergents or household soaps can break down the coating.
  • Two Bucket Method: One bucket for soapy water and one for rinsing the wash mitt reduces swirl marks.
  • Soft Microfiber Mitt: Avoid rough sponges or brushes that can create micro scratches.
  • Dry with a Plush Towel or Air Blower: Leaving water to air dry can cause water spots.

Washing every two to three weeks keeps contaminants from bonding to the surface and maintains the slick, glossy feel.

Decontamination and Light Polishing

Even with a ceramic coating, contaminants like iron particles or tar can accumulate over time.

  • Use a Coating Safe Iron Remover: Spray-on decontaminants dissolve brake dust and road film without stripping the coating.
  • Occasional Light Polish: A very fine finishing polish can remove small water spots or light swirl marks, but avoid heavy compounds that can thin or remove the coating.
  • Apply a Ceramic Booster: After decontamination, use a spray sealant or topper designed for ceramic coatings to restore hydrophobic properties.

This level of maintenance is typically needed every six to twelve months depending on driving conditions.

Spot Repairs and Professional Touch Ups

Ceramic coatings are strong but not indestructible. Chips, deep scratches, or areas where the coating has worn away need attention.

  • Minor Areas: A ceramic spray topper can refresh small dull patches.
  • Deeper Damage: If the coating is visibly failing or the paint is scratched through, a professional detailer can polish the panel and reapply the coating.
  • Avoid DIY Heavy Compounding: Aggressive polishing can remove the coating completely and damage the paint beneath.

Key Habits for Long Lasting Results

  • Wash in the shade and avoid direct sunlight to prevent water spotting.
  • Remove bird droppings, tree sap, or bug splatter as soon as possible.
  • Avoid automatic car washes with brushes that can scratch or strip the coating.
  • Use high quality microfiber towels and keep them clean to avoid dragging dirt.

Conclusion

A ceramic coating reduces maintenance but does not eliminate it. Gentle washing, occasional light polishing, and prompt repairs keep the coating strong and the paint underneath looking like new. With the right routine, the slick gloss and water beading that made you choose ceramic in the first place will last for years.

The Best Polishing Techniques for Different Paint Types to Minimize Swirl Marks

Polishing a car can bring back a deep, reflective shine, but the wrong technique often creates swirl marks instead of removing them. Swirl marks are tiny circular scratches that scatter light and dull the paint. They usually come from aggressive pads, dirty tools, or polishing methods that are not suited to the type of paint on the car. The safest way to protect the finish is to match your polishing technique to the specific paint system.

Understanding Different Car Paint Types

Every car does not have the same kind of paint. Each surface reacts differently to heat, pressure, and abrasives, so knowing the paint type is the first step before you touch a polisher.

Single Stage Paint

This older style combines color and protection in one layer. It is softer than modern clearcoats and can oxidize quickly. Single stage paint corrects easily but can be thinned if polished too aggressively.

Basecoat and Clearcoat

Most modern cars use a color layer covered by a clearcoat. The clear layer adds depth and protects the color but is sensitive to high heat and heavy compounds.

Soft Clearcoat

Some manufacturers, especially Japanese brands, use a clearcoat that scratches easily. It requires light pressure and fine polishes to stay swirl free.

Hard Clearcoat

Many German brands use a harder clearcoat that resists scratching but also needs stronger correction to remove defects.

Ceramic Coated Surfaces

A ceramic coating sits on top of the paint and offers extra hardness. It can hide light swirls but is difficult to correct if damaged.

Matte or Satin Finishes

These finishes are designed to look flat, not glossy. They cannot be polished with abrasive methods without creating shiny spots.

Preparing the Surface Before Polishing

Preparation is half of the job. Dirt or bonded contaminants left on the paint can be dragged across the surface and create new scratches.

  1. Wash the car thoroughly with a pH neutral shampoo.
  2. Use a clay bar to remove embedded particles.
  3. Inspect the paint under strong light to locate swirls or oxidation.

A clean and smooth surface allows the pad to glide without cutting too deep.

Polishing Techniques for Each Paint Type

Different paint types need different levels of correction. Starting with the least aggressive method protects the finish and reduces the risk of new swirl marks.

Single Stage Paint

Use a dual action polisher with a soft foam pad and a mild polish. Work slowly in overlapping passes with light pressure. Finish with an ultra-fine polish to refine the shine and protect with a wax or sealant.

Basecoat and Clearcoat

A dual action polisher is the safest choice. Begin with a medium polish and a polishing pad to remove swirls, then follow with a finishing polish for maximum clarity. Always seal the surface after polishing to guard against new scratches.

Soft Clearcoat

Use a finishing polish and a soft pad only. Keep machine speed low and inspect often. Gentle pressure and frequent pad cleaning are essential to avoid micro marring.

Hard Clearcoat

Start with a medium cut polish and a microfiber or medium foam pad. Moderate pressure and slow arm movement help the abrasives break down properly. Always follow with a finishing stage to jewel the surface and remove any haze.

Ceramic Coated Paint

Only perform very light polishing with an ultra-fine finishing polish and a soft pad. Heavy compounds will strip the coating. After correction, apply a ceramic topper to maintain protection.

Matte or Satin Finishes

Avoid machine polishing entirely. Clean with a matte specific cleaner and protect with a matte sealant. Any abrasive action will create unwanted gloss.

Tips to Minimize Swirl Marks

  • Work in a shaded area so heat does not soften the paint.
  • Use clean pads and microfiber towels at every stage.
  • Keep the polisher moving slowly and evenly to avoid creating hot spots.
  • Wipe residue gently to prevent new scratches.

These habits are as important as the choice of polish or machine.

Protecting the Finish After Polishing

Once the paint is corrected, seal it to preserve the swirl free look. Wax provides a warm shine but needs frequent reapplication. Synthetic sealants last longer and create a slick surface. Ceramic coatings give the strongest and longest protection against future swirls.

Final Thoughts

Polishing is more than making paint shiny. It is a controlled process that removes a very thin layer of material, so the method must match the paint type. Soft paints require delicate handling, hard paints need stronger correction, and matte finishes demand no abrasion at all. By preparing the surface carefully, choosing the right pad and polish, and sealing the finish, you can restore a brilliant gloss and keep swirl marks away for months to come.

How Often Should You Detail Your Car’s Engine? Myths vs Reality

Engine detailing is one of those car care tasks that many owners either overdo or completely ignore. Some people believe it must be done every few weeks, while others think it is unnecessary unless you plan to sell the car. The truth lies somewhere in between. Understanding how often to clean the engine bay requires separating common myths from real maintenance needs.

Why Engine Detailing Matters

The engine bay collects dust, grease, road salt, and oil over time. A dirty engine can trap heat, hide leaks, and make repairs more difficult. A clean engine is not just about looks. It helps with early detection of problems such as oil leaks or cracked hoses and makes routine maintenance easier.

Common Myths About Engine Detailing

Myth 1: You Need to Detail the Engine Every Month

Frequent detailing is unnecessary and can even be harmful if water or strong cleaners reach electrical parts. Most cars do not accumulate enough grime in a single month to justify such frequent cleaning.

Myth 2: A Dirty Engine Runs Hotter

A thin layer of dust does not affect operating temperatures. Overheating is usually caused by cooling system issues, not surface dirt. Heavy grease buildup can trap heat, but that takes months or years to form.

Myth 3: Engine Detailing Damages Electronics

When done correctly with proper covers, low pressure water, and safe cleaners, detailing is safe. Damage occurs only when people spray high pressure water directly into sensitive areas.

The Reality: Ideal Engine Detailing Frequency

For most vehicles, a full engine detail once or twice a year is enough. This schedule removes harmful buildup without exposing sensitive components to unnecessary moisture or chemicals.

  • Daily drivers in normal conditions: Once a year is typically sufficient.
  • Cars in dusty or snowy areas: Twice a year helps remove road salt, sand, or heavy dust.
  • Show cars or vehicles for sale: A fresh detail before a show or sale improves appearance and resale value.

Spot cleaning in between full details is helpful. Wipe visible dust or small oil spots during routine maintenance without using water or heavy cleaners.

Signs Your Engine Needs Immediate Attention

Instead of following a strict calendar, watch for these indicators:

  • Visible oil or coolant leaks
  • Heavy grease buildup around the valve cover or belts
  • Strong burning smells after driving
  • Debris such as leaves or mud after off-road trips

If you notice these issues, a professional detail or a careful home cleaning should be done sooner.

How to Detail Safely

If you decide to clean the engine yourself, preparation is critical.

  • Cover electrical components like the alternator and battery connections.
  • Use a degreaser designed for automotive engines.
  • Rinse with low pressure water or a damp microfiber towel.
  • Dry thoroughly to avoid moisture lingering in connectors.

A professional engine detailing service ensures proper cleaning with minimal risk, especially for newer cars with complex electronics.

Key Takeaway

Engine detailing is not about constant scrubbing but smart maintenance. Once or twice a year is ideal for most vehicles, with occasional spot cleaning when needed. Ignore the myth that monthly washing is required or that a clean engine bay automatically runs cooler. Focus on gentle, careful cleaning and your engine will stay protected and easy to maintain.

How to Repaint Car Interior Plastic: A Step-by-Step DIY Guide

Over time, the plastic parts inside your car can start to fade, crack, or lose their original color. Sunlight, heat, and daily wear make interior trim panels look old and worn out. Instead of replacing them, you can repaint them to bring back a fresh, like-new appearance.

Repainting interior plastic is easier than you think. With the right prep, tools, and paint, you can transform faded panels, door trims, center consoles, and dashboard pieces. The process doesn’t require expensive equipment, and it can be done at home in just a few hours.

Here’s how to repaint car interior plastic the right way, step by step.

What You’ll Need

Before getting started, gather these materials for a smooth and professional-looking result:

  • Interior-safe plastic spray paint or vinyl dye
  • Plastic adhesion promoter (primer)
  • Plastic-safe cleaner or degreaser
  • Fine-grit sandpaper (400–600 grit)
  • Scotch-Brite pad or sanding sponge
  • Painter’s tape and masking film
  • Microfiber cloths or lint-free towels
  • Gloves and a dust mask
  • Optional: clear coat (matte, satin, or gloss finish)

Make sure you choose paint that’s specifically made for interior automotive plastic. Regular spray paint can peel or crack over time if not formulated for plastic surfaces.

Step 1: Remove or Mask Off Interior Parts

If possible, remove the plastic parts you want to paint. This gives you better control and cleaner results. Use a trim removal tool to gently pop off panels, vents, or handles. If some pieces can’t be removed, use painter’s tape and masking film to protect surrounding surfaces like upholstery or electronics.

Work in a well-ventilated area like a garage with open doors or outside on a dry day. Avoid painting in direct sunlight or high humidity.

Step 2: Clean the Surface Thoroughly

Interior plastic may not look dirty, but oils from your hands, dashboard dressings, and dust buildup can prevent paint from sticking properly. Use a plastic-safe cleaner or degreaser to remove all residue. Spray it directly onto the surface and wipe with a microfiber towel.

Make sure the surface is completely clean and dry before moving to the next step. Even small traces of grease can ruin the finish.

Step 3: Sand the Surface Lightly

Use fine-grit sandpaper or a sanding pad to scuff the plastic surface. This helps the paint and primer stick better. You don’t need to sand heavily  just enough to dull the shine and create a smooth, even texture.

After sanding, wipe off the dust with a clean, dry cloth. Use compressed air or a tack cloth to remove any leftover particles.

Step 4: Apply Plastic Adhesion Promoter

A plastic adhesion promoter is a type of primer made for plastic. It helps the paint bond properly and last longer. Shake the can well and apply a thin, even coat over the surface. Hold the can about 6 to 8 inches away and use light, sweeping motions.

Let it dry for 5 to 10 minutes before applying paint. Follow the instructions on the label for best results.

Step 5: Spray the Plastic Paint

Shake the spray paint can thoroughly. Apply light coats in even passes, keeping the can the same distance from the surface. Start spraying just off the edge of the part and move smoothly across, then release the nozzle after each pass.

Apply 2 to 3 light coats, allowing about 10 minutes of drying time between each. Don’t try to cover everything in one coat  this can cause drips or uneven texture.

Check for any missed spots or patchy areas and go over them gently until the finish looks even and clean.

Step 6: Let the Paint Cure

Once you’re happy with the coverage, allow the paint to dry completely. Most interior plastic paints are dry to the touch in 30 minutes, but full curing can take 24 to 48 hours depending on temperature and humidity.

If desired, apply a clear coat to protect the paint and add your preferred finish  matte, satin, or gloss. Make sure the paint is fully dry before applying clear coat.

Step 7: Reinstall Trim and Panels

Once everything is cured and dry, reinstall any parts you removed. Be careful not to scratch the fresh paint. Check the fit of all pieces and clean up any masking tape or overspray from nearby areas.

Your car’s interior should now look refreshed, clean, and much newer than before.

Tips for a Long-Lasting Finish

  • Always prep the plastic with sanding and proper cleaning
  • Never skip the adhesion promoter
  • Keep layers light and even rushing causes streaks
  • Avoid touching or using the parts until fully cured
  • Use interior detailing spray for maintenance, not silicone-based products

Repainting your car’s interior plastic not only improves its appearance but also helps maintain its value. When paired with regular care like vacuuming, interior detailing, and conditioning, your car cabin can look new for years.

Conclusion

Knowing how to repaint car interior plastic can save you money and bring life back into your vehicle’s cabin. With basic tools, the right paint, and a little time, even old and faded trim can look factory fresh. Whether you’re restoring a classic car or just upgrading a daily driver, this DIY project offers a big visual upgrade without breaking the bank.

Interior plastic doesn’t have to stay dull or damaged. A clean, smooth repaint can completely change how your car looks and feels from the inside.

How to Wax a Car with a Buffer: Step-by-Step Guide for a Flawless Shine

Waxing your car helps protect the paint and keeps it looking fresh, but doing it by hand can be tiring. If you want faster results with less effort, using a buffer is a smart option. It spreads the wax evenly and gives your car a smooth, mirror-like finish. But if you’ve never used a buffer before, you might worry about doing it wrong.

The good news is, waxing with a buffer is simple when done correctly. All it takes is the right products, a gentle touch, and a few easy steps. Whether you’re using a dual-action polisher or a rotary buffer, you can achieve professional results at home.

Let’s walk through everything you need to know.

What You’ll Need Before You Start

Before you begin, gather all the tools and supplies. This ensures a smoother process from start to finish.

  • Electric buffer (dual-action recommended for beginners)
  • Foam or microfiber pad (apply pad)
  • Quality car wax (paste or liquid)
  • Clean microfiber towels
  • Car wash soap and water
  • Clay bar or surface prep (optional but helpful)
  • Masking tape (to protect trim and edges)

Make sure the car is parked in a shaded area and the surface is completely cool to the touch. Waxing under direct sunlight can cause the product to dry too quickly and leave streaks.

Step 1: Wash and Dry the Car

Start with a full hand wash to remove dirt, dust, and grime. Waxing on a dirty surface can cause swirl marks or trap debris under the wax layer. Use car shampoo and clean microfiber towels. Rinse thoroughly and dry completely.

If your car’s paint feels rough to the touch, consider using a clay bar to remove stuck-on contaminants. This step helps the wax bond better to the paint surface and creates a smoother finish.

Step 2: Apply Wax to the Buffer Pad

Once the car is clean and dry, attach the foam pad to the buffer. Apply a small amount of wax onto the pad about three or four pea-sized drops. Don’t overload the pad. Less is more when using a buffer.

Some waxes can also be applied directly to the panel, but adding it to the pad gives more control. If you’re using paste wax, spread a thin layer on the pad using a spatula or your fingers.

Step 3: Spread the Wax on the Surface

With the buffer turned off, dab the wax onto the surface by lightly touching the pad against the car in several spots. This helps spread the product evenly before turning the buffer on. Choose one section at a time, like a fender or a door.

Then, turn on the buffer to the lowest or medium speed setting. Gently move it across the panel in overlapping lines. Start with horizontal passes, then go vertical to cover the entire area. Keep the buffer flat against the surface and don’t press too hard. Let the machine do the work.

Avoid staying in one spot too long, as it can cause uneven buildup or haze.

Step 4: Let the Wax Haze and Set

Once the wax is applied, let it dry to a light haze. Check the wax instructions to see how long this takes. Usually, it takes about five to ten minutes. When it turns slightly cloudy, it’s ready to be removed.

During this time, you can move on to another section of the car and repeat the process.

Step 5: Buff Off the Wax with a Clean Towel

Use a soft, clean microfiber towel to gently wipe off the hazed wax. Work in circles to bring out the shine. Flip the towel often to avoid smearing leftover wax around.

If there’s still wax stuck to the surface, a quick spray of detailer or water can help remove it more easily.

Repeat this process on all sections of the car until everything is smooth, glossy, and streak-free.

Step 6: Final Check and Clean-Up

Walk around the car in natural light and check for missed spots. Sometimes, wax residue can settle in cracks, near emblems, or on black trim. A detailing brush or extra towel can clean those areas quickly.

Make sure to remove any wax from rubber or plastic trim. If left on too long, it can cause staining or discoloration. This is where masking tape helps during the preparation stage.

Once everything is polished and clean, your car should have a deep, smooth shine that lasts for weeks.

Tips for Best Results When Using a Buffer

  • Always start with a clean car to avoid scratches or swirl marks.
  • Use a dual-action buffer if you’re new it’s safer and easier to control.
  • Choose a wax that works well with machine application. Liquid waxes are often better for buffers.
  • Replace the pad if it becomes too saturated with wax.
  • Work in small sections to keep everything even and manageable.

How Often Should You Wax Your Car?

In general, waxing every 2 to 3 months helps maintain protection and shine. If your car stays outside or faces harsh weather, consider waxing more often. Using a buffer makes regular waxing quicker, so it’s easy to keep up with.

Pairing waxing with other detailing steps like washing and interior cleaning also helps your car stay in top condition.

Conclusion

Learning how to wax a car with a buffer isn’t complicated. It saves time, gives better coverage, and leaves your car with a smooth, glossy finish. As long as you follow the steps, use the right tools, and apply wax evenly, you’ll get a showroom-like shine without paying a professional.

Whether you’re new to detailing or looking to improve your process, a buffer is one of the best tools to have in your garage. Take care of your car’s exterior regularly, and it will not only look great but stay protected for the long haul.

How Do You Know If Your Car Engine Is Blown? 9 Warning Signs to Watch For

Car trouble can be frustrating, especially when you don’t know what’s causing it. If your car suddenly stops working, loses power, or shows signs of serious damage, you may wonder if the engine is blown. A blown engine is one of the most serious problems a vehicle can have. It usually means the engine has experienced major internal damage and can no longer run safely or efficiently.

Before you panic, it helps to understand the common symptoms. In many cases, the signs appear gradually. Knowing what to look for can help you act fast and possibly avoid complete engine failure.

Here are the most common signs your engine may be blown, what causes it, and what you should do next.

Thick White or Blue Smoke from the Exhaust

Smoke from the exhaust is one of the earliest and clearest signs of engine trouble. White smoke often means coolant is leaking into the combustion chamber. This can be caused by a blown head gasket or a cracked engine block. When the engine burns coolant, it creates thick white smoke that pours out of the tailpipe.

Blue smoke, on the other hand, usually means that the engine is burning oil. This can happen when oil slips past worn piston rings or damaged valve seals. It may also be the result of a cracked cylinder or damaged piston. Burning oil leads to a strong smell and steady blue smoke.

Both white and blue smoke indicate internal engine damage. If the smoke continues after the car warms up, it’s time for a serious inspection.

Knocking or Tapping Noises from the Engine

Unusual engine sounds are never a good sign. A knocking sound, especially one that gets louder as the engine revs, may point to a condition called rod knock. This happens when the rod bearings inside the engine wear out or fail, causing metal components to slam against each other.

Tapping or ticking noises may also suggest that parts like the camshaft, rocker arms, or lifters are worn or broken. These sounds are a strong indication that the engine’s internal components are no longer working in sync. If ignored, the damage can quickly become irreversible.

A healthy engine should run smoothly and quietly. Loud knocking or tapping should never be ignored, as it usually means the engine is close to failing completely.

Engine Overheating Frequently

An overheating engine is a major red flag. Engines get hot during use, but if the temperature climbs too high or stays high for too long, internal damage can happen fast. Common causes of overheating include a broken thermostat, a leaking radiator, or a failed water pump. Overheating can warp the cylinder head, destroy the head gasket, or even crack the engine block.

Once these parts are damaged, coolant may leak into places it doesn’t belong, leading to further damage. If you notice your temperature gauge rising or steam coming from under the hood, stop driving immediately and let the engine cool down.

Ignoring overheating issues can quickly lead to a blown engine. Regular maintenance and inspections help prevent these problems before they get worse.

The Car Won’t Start or Keeps Stalling

If the engine doesn’t turn over or starts and then dies, it could be due to major internal damage. A blown engine may lose compression, which makes it nearly impossible to start. You might hear the engine trying to crank, but it never catches. This is often caused by worn pistons, broken piston rings, or bent valves.

In some cases, the engine may start but then stall while driving. This could indicate damage to the fuel injectors, ignition coils, or even timing issues. If your car suddenly cuts off, and you’ve ruled out battery or starter issues, engine failure could be the reason.

When an engine loses compression or can’t fire properly, it will struggle to start or stay running. A compression test or diagnostic scan can help confirm the problem.

Flashing Check Engine Light

The check engine light is your vehicle’s way of warning you that something is wrong. A steady light might mean a minor issue, but if the light is flashing, the situation is more serious. Flashing usually points to an engine misfire, which can damage the catalytic converter and other critical systems.

A misfire can be caused by problems with spark plugs, fuel injectors, or even internal engine damage. When these parts stop working correctly, the fuel mixture inside the engine no longer burns evenly. This leads to rough performance, vibration, and loss of power.

If your check engine light flashes and the car runs poorly, get it checked right away. Continuing to drive could cause more damage and increase the chances of a blown engine.

Oil Leaks or Milky Oil Appearance

Your engine needs oil to lubricate moving parts and prevent overheating. When you notice oil leaking from underneath your car or find milky oil on the dipstick, it may be a sign of serious engine trouble.

Milky oil often means that coolant has mixed with oil inside the engine, which usually happens when the head gasket fails. This mixture can no longer protect the engine, causing parts to wear out quickly. Oil leaks can also result from cracks in the engine block or oil pan.

Checking your oil regularly is one of the easiest ways to spot early signs of engine trouble. Dark, thick, or foamy oil signals that something is wrong inside the engine.

Loss of Power or Weak Acceleration

If your car suddenly feels sluggish or slow when you press the gas, the engine might not be performing as it should. Loss of power is often caused by low compression, which means the air and fuel mixture isn’t igniting properly.

This can result from worn piston rings, leaking head gaskets, or damaged valves. Other possible causes include clogged fuel injectors, dirty air filters, or ignition system failure. In most cases, a noticeable drop in performance points to a deeper mechanical issue.

Driving with a weak engine can be dangerous, especially when merging or passing other vehicles. Get it checked before it leads to complete engine failure.

Smoke or Burning Smell Under the Hood

Seeing smoke or smelling something burning while driving is never a good sign. This could be caused by leaking oil, overheating wires, or burning plastic parts. It often means the engine is running too hot or that fluids are dripping onto hot surfaces.

A clean engine bay can make it easier to spot these issues. Layers of grease or dirt can hide fluid leaks or worn hoses. That’s why regular engine cleaning is important. A service like engine detailing can help reveal hidden damage and improve the health of your engine.

Ignoring these signs could allow small problems to grow into major engine damage over time.

Engine Vibration and Shaking

Excessive shaking or vibration is another symptom of engine trouble. If the car vibrates while idling or driving, something inside the engine may be off balance. This could be caused by broken engine mounts, misfiring cylinders, or damaged internal parts.

When the engine is no longer aligned or balanced correctly, the entire car may feel unstable. This kind of shaking often comes with a rough sound or drop in fuel efficiency.

Continued vibration puts strain on other parts of the vehicle and often leads to bigger mechanical issues. Catching it early may save the engine from further damage.

Can a Blown Engine Be Repaired?

Repairing a blown engine depends on the type and extent of the damage. If the head gasket is blown or if one cylinder has low compression, it may be possible to fix it without replacing the entire engine. However, if the engine block is cracked or the internal components are severely damaged, the engine might need to be rebuilt or replaced entirely.

Engine repairs are often expensive and time-consuming, so it’s important to weigh the cost of fixing the engine against the value of the car. In many cases, early detection and maintenance can prevent engine failure before it gets this serious.

Keep Your Engine Healthy with Proper Maintenance

Many engine failures can be avoided with regular care and inspections. Checking oil levels, watching for warning lights, and paying attention to performance changes can make a big difference. Keeping the engine bay clean is also helpful for spotting leaks or damage early.

Engine detailing services help remove grease, grime, and dirt buildup that can trap heat and hide small cracks or worn parts. This improves visibility during inspections and helps extend your engine’s life.

Conclusion

If your car is smoking, shaking, leaking oil, or refusing to start, there’s a good chance something serious is going on. These signs often point to internal damage that could lead to a blown engine. Paying attention to early symptoms can help you catch the problem before it gets worse. When in doubt, it’s always best to have a trusted mechanic inspect your engine.